This was a nice trick which I found to remotely login to my Visual Studio Code setup at my lab while I’m working from home. Usually, I’d had to get some SFTP plugin to remotely edit the files with my local VSCode but these extensions make it possible to simply get access to the VSCode itself. By remote, I mean you can get it to run on an AWS/Google Cloud instance as well.
Pre-requisite: Installing VS Code
In any case you don’t have it installed on the remote server, follow this guide from the official VS Code documentation.
Method 1: Remote Development Extension
This is the official extension released by Microsoft to enable remote dev. You can find on how to use it through this downloading the extension “Remote Development”. Just make sure you have your SSH keys setup to login, and Visual Studio locally installed, and thats it.
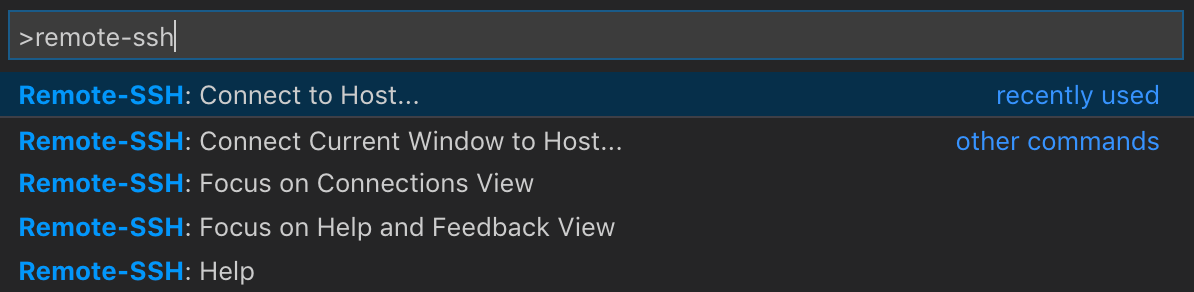
Configuration is quite easy, open up Visual Studio Code on your local machine. Then type in F1 to open up the configuration menu and select “Connect to Host”, then use the same details you use to SSH to your machine, and voila! Pro tip, make sure you have login enabled via SSH keys. I had an experience where the sshd process hung when I was trying to login via password, but the keys fixed it.
Method 2: Code-Server (VS Code in a Browser)
So remember seeing all those photos of VS Code running in a browser? This is it. For all of this the setup happens in the remote server, and your local machine its simply visiting the server URL and coding. This all happens to an open sourced project called “code-server”
Step 1: SSH to your remote machine, and make a folder where you want to install ‘code-server’.
Step 2: Download code-server, (this was created on April 25th, package could be updated later, you can get it from their GitHub page)
wget https://github.com/cdr/code-server/releases/download/3.2.0/code-server-3.2.0-linux-x86_64.tar.gz
Step 3: Untar it (unzip).
tar -xvf ./code-server-3.2.0-linux-x86_64.tar.gz
Step 4: cd to the folder code-server-3.2.0-linux-x86_64 and assign the proper permissions to run.
chmod +x ./code-server
Step 5: Now open up the port so you can access it from home.
sudo ufw allow 80/tcp
Step 6: (Optional) if you want to keep running your remote vs code even after you exit the terminal. Create a screen (virtual screen), by typing screen. Then do the next steps, this is optional. After you are done you can exit out of a screen with CTRL + A + D. So when you log out of SSH and log back in, you can simply type screen -ls to see the currently running screens and you can resume one by screen -r xxx, replace xxx by the ID you see from the -ls.
Now cd to the folder (remote_vs) and run code-server. Give it a moment.
./code-server –host 0.0.0.0
If you are running code-server version below 3.2.0 use this code.
./code-server –bind-addr localhost:8080
This is the code for code-server above 3.2.0

Step 7: Now the fun part, if you know the ip of your remote machine (lets say 192.168.1.1), then type in 192.168.1.1:8080 on your web browser then type in your password from the terminal, enjoy!

You will be able to use all your themes and extensions, some icon templates may not work.
Optional Step 8: In order to avoid typing you can assign a domain to your machine. Follow the instructions from this StackOverflow. This can also be used to enable the SSL.
Debugging Steps;
1. If you get error listen EADDRINUSE: address already in use :::8080, this means something is blocking the port. You can checkout whats using the port using sudo lsof -i :8080, which will show something below;
COMMAND   PID  USER   FD   TYPE  DEVICE SIZE/OFF NODE NAME
code-serv 925 cyril   21u  IPv6 5281273      0t0  TCP *:http-alt (LISTEN)
2. Now issue a kill with, kill -9 PID, in this case kill -9 925.
Stay healthy and happy remote-coding everyone!
Leave a Reply